Friday, 27 March 2015

staining the fence...pt.3 nearly there!

I finished the back fence today and also managed to do a few panels just outside our ensuite (also known as my 'Day Spa' lol

I have to admit, it's been a mammoth task but i can see the end is near and I should have it all completed by...I reckon about Tuesday

I can't believe how much it's changed the whole look of the yard especially the pool area, but even looking form the alfresco now gives it a whole new appeal

I reckon my plants have had a growth spurt in the last couple of weeks too, I can't see the pool (like I use to) when I take a shot from the back yard to get both huts in :( but i guess that's a good thing to know that perhaps i really do have a green thumb lol

Here's a few shots of what i done today:

here's where I got up to yesterday..pretty much inline with the hut


can you see how good it's going to look (once it's all done) from this end?

almost the same angle...this was taken back in September last year!


don't you just lurve my zen garden now? and it's right outside my ensuite!


 what a calming and relaxed view now


all 14 panels along the back fence are now done..Ive just got the left side to do...phew!


see what I mean...as I mentioned above, I can't see my pool :(


check out this old shot...and there is a pool!


look how small my plants were 


wow, this shot was taken before we did the deck in the second hut


god I'm a legend...bahahahaha

Wednesday, 25 March 2015

Staining the fence...pt.2


Yay, I've finally finished one side woohoo!
I was sooooo exhausted yesterday (Tuesday) that I had to have a rest and let my right arm recover
I finally finished the first side (on Monday) which I like to call the pool side and it looks amazing even if I do say so myself
I just love how it just makes everything surrounding it POP! 
Even my garden looks sooooo much more tropical now that the background is darker...don't you agree?
I managed to go over the deck and retaining walls again just to give them that extra boost of darkness  and just love how it's even lifted the look of the tiles
I can't wait to see it all completed and how it'll make our (already) Oasis feel more like we're on a holiday in the Bahamas! 


here's a view from the alfresco looking toward the back corner of the yard


looking from the back...don't mind my patchy grass, that's where the hubs has taken out some weeds


OMG, can you imagine what the view will look like from the bar area when the back is done?


here's a wider shot


what a difference...here's what the fence looked like before


at almost the same angel as the first pic, you can see how much the plants have florished!

omg, the fence just looks so plain


such a big difference hey?...wow!

Monday, 23 March 2015

Staining the timber fence pt. 1


I had a moment of pure wait for it....'mental madness' when I decided to do the unthinkable last Friday...staining the fence, all 100 plus metres of it, am I crazy or what?

All by hand I might add, no spray guns for me...lucky I love painting!

I started by staining behind the Buddha in the pool area first which was bloody hard with the gardens already in and getting established! I tell you it certainly wasn't easy getting behind some of the plants especially the Yukkas and I was literally scratched beyond recognition (maybe that's exaggerated a bit) and had my eyes almost poked out.. honestly!
But the end result was astounding to say the least and I'm so happy with it and cant believe how much it's changed the whole look again.
It's so Oriental looking now and if it didn't represent paradise before...then it truly does now!

I cant wait to see it all finished 


I completed the pool area by Saturday afternoon


By Sunday afternoon, I had done another 3 full panels towards the back fence

I took this shot with the mini iPad so its not that good but can you just imagine how awesome the fence will look once it's all complete?

I have another 4 panels to go before i start on the back...omg it's gunna take me forever!


Thursday, 5 March 2015

Ta da...


It's surprising what you can do with a little bit of imagination and creativity!

It helps if you can find what you need for nothing or very little spending and I found both!

I bought the pine bedside off eBay for $20 and the hardwood dining suite was given to me by our lovely neighbours who was selling it on eBay to which no-one had bid for.

And he cut it to size for me since he's a builder and has all the tools...woohoo!

Because the wall that I wanted it to go on was 3300mm and the table being 1900mm x 1000mm, cutting it down the centre to give 2 halves (width now 500mm each) would've been too long, so he took 250mm off the end to make the 2 halves at 1650mm x 500mm each which was perfect as the bedside would be the support for the centre.

Since there wasn't going to be anything heavy on the desks, I felt that there was no need to put any battens on the back wall however, I put a batten on each end to keep it stable


By the time I got around to sanding it last Thursday, I finished it completely by Saturday afternoon and I think it's turned out pretty damn good considering I had no help!

It took a lot of elbow grease I have to admit, and quite a few sanding discs too...phew!

But I'm flabbergasted by how much more room it gives me and how it makes the room look sooooooo much bigger now!

Oh, and I had to pop on some 40mm round timber feet on the bedside to raise the height that the table would've been with the legs on 


I also scavenged around my neighbourhood for some timber (saves me buying it) that I could use as a batten to fix the top to the side walls, a very accommodating tradie allowed me to hunt in his rubbish pile to find the right one...a 1metre piece of 4x2...purrrrrfect!

I cut that at 450mm x 2 and fixed them to the walls using (3) toggle bolts in each as the studs didn't line up


I had to cut a piece out (on either side) of the decorative top on the drawers (using a jig-saw) to allow me to fit the facing on as i didn't want any gaps


I also cut a hole for all the cords in the top with a hole saw and placed plastic cover on it


I'm really happy with the colour of the stain and it matches up perfectly with the buffet that I bought off eBay a couple of weeks back see here


After putting it all together on Sunday, I went and done a little decor shopping and seen these frames at K-Mart for $6 ea and bought some wooden letters (x & o) from Spotlight too and just painted them black and white and hot glued them to the (painted) backing of the frame


I printed off a nice saying that I've always loved..."If you can dream it, you can do it" how fitting is that saying?


I printed off black and white stripes to put in this one


I also bought some floating shelves from Bunnings @ $21 ea


So here is a reminder of what the room looked like before...


looks pretty small and somewhat compacted hey?


So the end tally for my new home office is...

Table - $0
Bedside drawer - $20
Buffet - $50
Floating shelves x2 - $42
Orbital sander - $79
Frames - $24
Material - $10
Wooden lettering - $13.50
Toggle bolts - $9
Timber batten - $0
Timber feet - $20
Elbow grease - priceless!

Bal = $267.50
Less sale of old desk - $250

Total cost = $17.50


Thursday, 26 February 2015

The prep...


I'll let the pictures tell the story.

Boy what a job it was rubbing these back! It probably took me longer than it should've but I'm happy with the job done so far.
I know I probably should've used paint stripper (to make it easier), but I just couldn't wait to finally get started and the last thing I wanted to do was wonder around Bunnings for 3 or so hours like always!
As it turned out I had to after my once faithful sander gave up on me after sanding back the drawers of the bedside table....bummer!

So only spending about 45 mins (I'm so indecisive), I ended up buying a new one in the form of a Ryobi orbital sander ($79) complete with 8 spare discs ranging from 60-240 grit, a dust filter and a bag...woohoo a new toy!
I felt like a kid in a candy shop when I got to the counter

So after getting back home and completing my first mission of taking it all back to bare timber, I was finally ready to give it all its first coat of Black Japan stain


I let the first coat seep through and had to let it dry for a couple of hours


Completing the second coat this afternoon on the first half of the desk and bedside, as much as I love how it looks, I'm worried that it maybe just a little too dark so I'm going to let this dry overnight and see how it is once I sand it back a little to prep it for the wax and buff


As fate would have it!

Well after cutting up my table on Saturday to make my dual desk for the home office, I would have to say that I'm quite pleased.

Once I get to sanding it all down, it shouldn't take too much longer to have the office finally up and running.

I found a bedside table to use as a support for the desk in the centre and use the drawers for my stationary on eBay that was ending soon and later that night, I noticed that the seller had another 2 bedsides (the same) for sale as well!

Since the bedside was only $20 (starting bid price), I sent the seller a message to say that I would like to buy all three and if she would take $50 for them.

She replied later saying that she would consider the offer since no-one had started the bid (on eBay) and she would get back to me when she finished work.

The auction finished jest before midday on Sunday and no-one had bidded...phew!

So I sent another message to say that I still wanted to buy the items and she replied that she was only going to sell one as her daughter had changed her mind about the other 2...bummer!

I still wanted the one so I replied and said ok I'll just have the one.

She rang me on Monday morning to say that she would drop it in to me on her way to work! I was quite happy to go and pick it up (only half hr away) at her convenience, but when she offered to drop it in to me, I took it.

I've got a big job ahead of me with all the sanding back and re-staining, but that's the good 'ol D.I.Y for ya.

I'm guessing I'll have it done in a couple of weeks give a day or two hehe.

So so far, the tally for my office spend is:

$50 - sideboard (eBay)
$20 - Bedside table (eBay) free delivery!
$0 - Dining table & chairs (eBay) free delivery!


Friday, 20 February 2015

Finally taking shape

Well I'm slowly getting my home office in order. I've sold my old desk and bookcase for the asking price of $250.

I did advertise it on eBay however it didn't sell although I had a couple of watchers and well over 100 views so it re advertised the next week automatically.

Whilst I hesitated at first, I decided to drop the price (just to get rid of it) to $125 to which I got more watchers this time but less views...bizarre!

So when it (again) didn't sell, I advertised it on a local buy and sell site where I put the original price on it of $250.00 and sold it within 20minutes of advertising...bizarre!

So now that I have a blank canvas once again, it's a lot easier to get the room organised for what I want to do

Over the prior weeks to writing this post, I've come up with the idea of buying a timber dining table wide enough for me to slice down the centre to give me (2) halves which I'll turn into a double desk...simple!

So during the 2 weeks that I was selling my old desk, I was watching a few dining tables suitable to my needs on eBay however, I wasn't prepared to pay more than what they ended up going for so I was left feeling that this may not be the way to go!

That was until the other day!...keep reading your gunna love this!

Thursday, 5 February 2015

Show us your Alfresco!


After being convinced by my lovely friend Renee (from our local Homeone forum and neighbour), who said that I should enter the McDonald Jones Homes 'Show us your Alfresco' competition to win $1000, I hesitated at first and then thought bugger it, I will

As much as we just looooove our home, we tend to use the alfresco more than any other room not just for entertaining, but just to sit out there on a nice day and have our late afternoon drinks overlooking the pool and then dinner whilst watching the telly!

I'm not sure if the photo I chose will win (after all I just did it for fun), but it would be nice to know that others would think it's worth it

I could've sent in about 100 photos (I'm always taking them), but your only allowed 1 and given that I haven't got a wide lens as yet, this one shows a bit of the pool area that we see whilst sitting on the outdoor lounge


So if you think we have a chance to win, please vote for us by visiting http://woobox.com/ye2w7i

Competition closes on the 8th Feb at midnight

Thanks


Thursday, 29 January 2015

A little photoshoot...


You can tell I just love taking photos of my new dining table can't you? I think I've taken just about every angle of it and it seems I just cant get enough lol
It's amazing what a great camera can do for a photoshoot too, I've been using a Canon EOS 60d which is a far cry from my last camera which was a Nikon d90 (which I loved) but due to dropping it one day while on holidays, it would've cost an arm and a leg to fix so I opted to buy (and try out) the Canon to compare since it was a little cheeper


I'm still learning how to take great photos with it and using it to it's full potential, but as you can see... I've still got a ways to go


And trust me, the kitchen doesn't always look this tidy all the time! That's the OCD in me, I have to have a clean and tidy work area before I take a shot and god knows how loooooong I spend trying to get everything right!

On a different note...I love how the dining setting gives great contrast to the dark kitchen and can't see any other colour giving the same effect...well done to me lol

Sometimes I wish I had nice dark stained timber floors so I could've had my nice white and timber kitchen to go with it, but since hubby was against timber floors (deep down I think he really would've liked them) I had to go the opposite somehow to compromise :(

That's why I came up with the look that it is now, and being quite found of charcoal anyway, as soon as I saw it in the Polytec display book, I knew I had to incorporate it into the home

Should I have combined it with another colour...perhaps white top cupboards....probably
Should I have gone for a whiter bench top too....probably
Should I have gone with a lighter splashback as well...probably

But I love my kitchen the way it is and at least I can change the decor to suit my ever changing mind whenever the need arises!

Until next time... 


Thursday, 22 January 2015

Push Control System by Schneider-Electric


http://www.pushcontrols.com/home.html


Have you been watching the commercials for the new Block 2015 lately?

Well you would've seen that the contestants are putting in the new Push Control Systems by Schneider-Electric which leaves the judges gobsmacked and wanting one!

Well I can vouch for their amazement and envy because we have it in our home and control our home theatre system including the sky panels and wall lights, and even our outdoor blinds!  It truly is amazing!

You can control everything from, your lights, fans, outdoor security, garden lighting, alarm and sooooooo much more.

Controlled via the App that you can download from the App store on your iPad and iPhone...booya!

Short of cooking dinner and doing the dishes, it's gotta be the best thing since sliced bread...ahhhh the luxuries!
watching normal t.v on the big screen

controlled form both the iPad and iPhone 

you can control it to just have the sky panels on or...


with both the sky panels and wall lights. We had it set up so when you press play to start the movie, the wall lights dim and then go out after 40 seconds...just like the cinema!

Due to us having our audio equipment in the linen cupboard (adj to the back wall of the theatre) it makes it easier to control the projector right from your seat as it's all infrared woohoo... makes me so lazy lol


Wednesday, 21 January 2015

Selling items on eBay...

Selling stuff on eBay can be a little daunting but if you take the time to dress up your items and take better photos, you have a better chance of selling them for the not only the asking price, but perhaps more than you ever thought you could get.

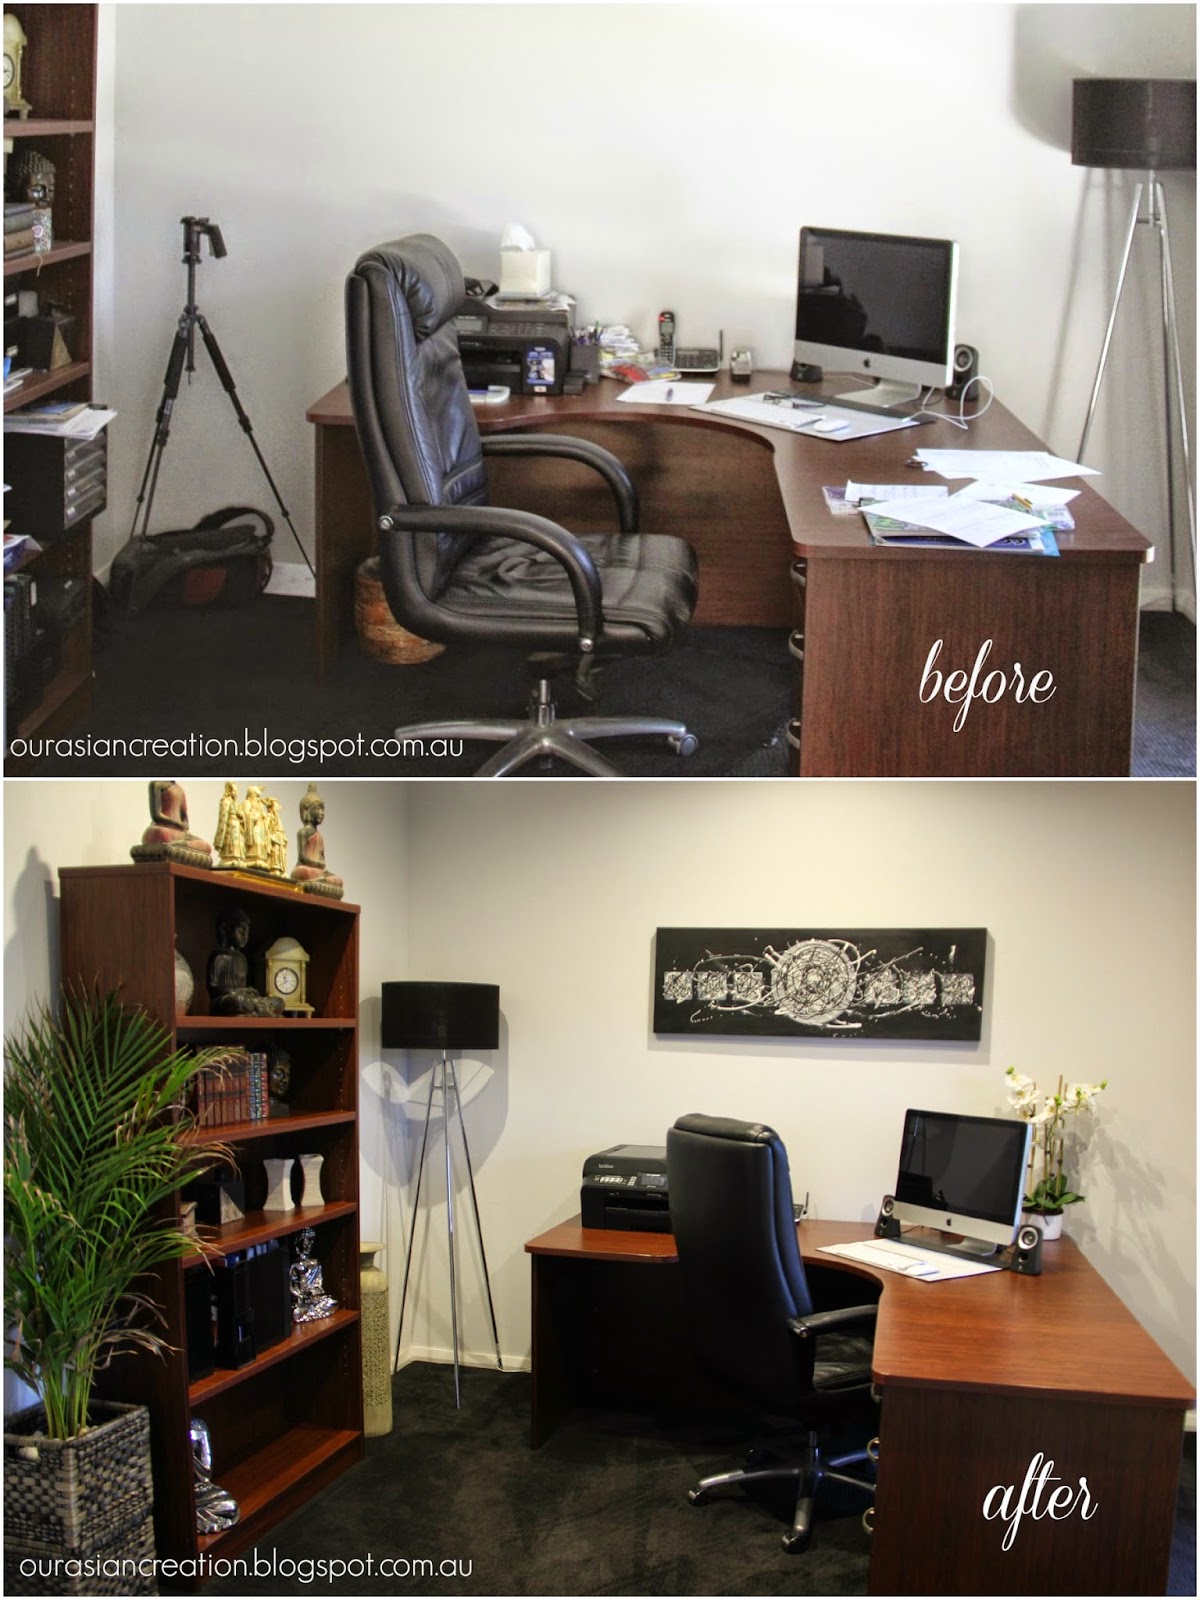
Take these pictures of the before and after shots...

If I were to advertise both the desk and bookcase and used the "before" photo, chances of me getting a good price or even selling them at all would very slim indeed.

Now, advertising them using the picture of the "after" shot, will definitely give me a better chance of seeing a "Sold" mark against them.

So don't make your photos "BORING"

You should also think about being realistic when it comes to selling second hand goods. Take into account, the age and condition of each item. You shouldn't ask for top dollar if your items are well and truly passed their "use by date" I mean...this office (including the leather chair) cost around $1500-$1700 for memory around 8 or so years ago. Sure it's in perfect condition with no scratches or chips or marks for that matter, but I know I won't get that amount no matter where it's sold!

I have to be realistic and price it accordingly...someone out there will fall in love with it I'm sure and just because it doesn't suit me anymore, doesn't mean it won't be perfect for them and yes it comes with a separate 3 drawer filing cabinet on castors that you can either slide under the desk or on it's own!
So that's a 3 piece unit or 4 piece if I include the chair.

Seeing it all tidied up, clean and organised, will give the potential buyer a better idea of what it really looks like. It also gives the buyer a clear vision of what it'll look like in their home

And just because this is a corner desk, doesn't mean you have to put it in a corner!

How you word your advertisement will make all the difference too. There has been many a time that I've flicked through eBay and noticed some shocking adverts that are also with ridiculous prices to boot!

Here's an example of an advert that I've seen and I'll use the office to give you an idea:

"Up for sale is a desk with a book shelf and chair"

That's it....no measurements, no full description of what's advertised and it's described incorrectly, it's not a book shelf, it's a bookcase!

Here's how I would advertise it:

"Up for sale is a very well looked after, walnut coloured timber veneer home office corner desk complete with matching three drawer filing cabinet on castors for easy manoeuvre, and a bookcase complete with 4 adjustable shelves.
Purchased around 7 years ago, it comes from a smoke free home with no scratches, chips or damage what-so-ever
Measurements are as follows:
Desk: width x length x height 
Bookcase: width x length x height
Filing cabinet: width x length x height with and without castors
(accessories are not included)"
Thank you for watching and good luck

I always add a little thanks at the end, I think it's probably why we're so successful with our sales

See the difference a little time and effort will make when you add more detail

Show as many pictures as possible and include with and without accessories! Give FULL details and measurements as exact

Clean any marks and dust off all decor, no one wants to see grubby finger marks or 10mm of dust everywhere, and dress it accordingly...could you imagine if I had a pile of papers and ugly books or ornaments in the bookcase?

I hope that's helped you somewhat in either purchasing or selling on eBay

Bye for now and thanks for stopping by

What a bargain!


I couldn't believe my luck when I won these items the other day from my favourite on-line store... eBay!


The first picture is a timber Buddha wall hanging that is 1200x800 which we want to hang on the large blank wall (outside) near the front door. I'm not too fussed with the colour of it at the moment so no doubts I'll wave my magic wand...aka paint brush, and stain it a little darker.

We've been after something for the entry for sometime now but everything we see is really expensive. I only paid...wait for it...$20 bucks, well $20.50 to be exact (the bid started at $20), what a bargain!

The timber buffet next to it is from the same seller and I bought that for the office...that I'm still in the process of doing up!

It was another bargain at $122.50, and solid as...and look at all that storage! I'll go ape filling this little beauty with all my craft...and office stuff of course!
I love the colour too, dark chocolate perfect for what I want to achieve in the office (bidding started at $75)

The little black leather chair is still yet to be won (finishes today) but I thought I'd show you what I wanted it for and yes again it's for the office as I'll have a spare corner which will be perfect to house it. It's currently still $20 bucks and I won't pay anymore than $50 as it's a little warm on the bum but otherwise it's perfect

The desk was won last Sunday at a bargain of $300 (bidding started at $300) and currently still worth $1000 brand new! It's in perfect nick with no scratches and a leather in-lay and 2 filing drawers....not that master J will need them but they're there if he should one day!

This will be going in the activity room in the alcove already provided. I wanted to just have a slab of timber (floating so to speak) but we couldn't get anything decent and didn't want to pay mega bucks for so this will have to do and besides, it came with it's own leather high back chair and once again...in perfect nick!

We'll be picking the items up on Saturday, so once we put them in place, I'll do another post!

I tell you folks, eBay is the way to go and you can always...always grab a bargain if you know what to look for and do your homework.

My personal tips:
1. Never pay more than what it's truly worth
2. Be patient and don't bid over your head just because you want it.
3. If you miss out the first time....there's always something else that'll come along and sometimes something better and or cheeper!
4. If you have been bidding and still miss out, you may get a second chance if the sale doesn't go through.
5. As with the step above, always let the seller know your still interested
6. If the pictures are not clear enough, ask the seller to send you extra, they won't mind and after all, a sale is a sale. Alternately you can arrange to view the item before bidding depending on time
7. Sometimes the item isn't described in great detail, so ask the seller every question you need to to be sure your getting what you want.

If your selling something on eBay:
1. Always take more photos than needed, there's nothing worse than seeing something for sale with only one picture to go by.
2. Take nice photos of the item/items just like you would see it in a shop...dress it up a little and if selling furniture, have photos with a little decor and definitely no MESS!
3. Always include correct measurements
4. Describe your item clearly and if there's any marks or defects, make sure you take a photo and add a clear description of it, people will appreciate your honesty and you'll be covered should anyone say they weren't aware when picking up
5. Make sure you have some type of change when they come to collect their item if paying by cash

Until next time...

Monday, 19 January 2015

A clean home is a healthy home!

Do you hate cleaning?....I know I do but hey, someone has to do right?  and that my lady friends is usually us...well especially if we want it done properly and and to our satisfactory!

You probably think that I'm a clean freak when you see all the photos of my kitchen and bathrooms, but believe me when I tell you, they certainly don't look like that everyday...trust me!

Being a mum of 4 boys (two teen still at home), well one's 15 and the other 12 but I'm sure you get were I'm heading, cleaning up after them and giving the house a somewhat spotless appearance, is a full-time job!

I'm certainly no different to the average stay at home mum, but I do like having a clean home and am always trying to use non chemically based products which is always better for both our health and that of the environment. But lets face it, everything has chemicals of some sort in it even the "Natural" ones, but I try to go green whenever I can.

I've sourced many a different cleaning remedy here and there and have asked anyone willing to admit what they, or their grandmother or mother used.

I've been flabbergasted by some of the old remedies and by jingoes they really do work!

Who would've thought that cleaning windows or glass would be a breeze when just using some water mixed with a bit of vinegar and a couple of drops of lavender and lemon essential oil? I tell you, I'll never use windex and newspaper ever again.


I've also heard that by adding a tablespoon of cornflour to 1 litre of water works well too, use a micro-fibre cloth to wash and use another dry one to wipe!

Did I mention the good 'ol "bi-carb soda"?...OMG this stuff is amaze-balls! I've cleaned my oven twice now with it and it's probably cleaner than when it was brand new!

I've cooked 2 roast porks in it now and you know how much mess they make due to getting the skin to crackle? I swore after trying to clean the oven (with normal oven cleaner) the first time that I would never do it again, but that soon went by the wayside over christmas!


Usually when I do a roast (lamb), I place it in an oven bag and voila' no mess woohoo, but you can't do that with a roast pork unfortunately so the good 'ol bi-carb strikes again.


All you have to do is mix it into a paste with a little water and spread it over the oven (make sure oven is cool) and leave over night. The next morning you just wipe down and clean with hot soapy water (use gloves) and just like magic...it's all shiny and brand new again. You may have to repeat if necessary.

To clean your grout in the bathrooms, again use bi-carb and water made into a paste and scrub using an old toothbrush, then rinse well!

To make sure mould never forms (especially) in your bathroom, get plenty of air to the room by leaving a window open, turning on an air vent when showering, wipe down tiles after use and leave the shower door open when not in use. Also, make sure you take off and wipe the plastic seal under glass screen doors as it can be a haven for mould.
 For cleaning (glass) shower screen doors, use the remedy of water, vinegar, lavender and lemon essential oils as above...not only does it clean the glass, but it leaves a beautiful aroma in the bathroom too.

To clean your drains, don't use bleach or other detergents, a more natural way is to pour some boiling water and a handful of salt down it. Clean around the top by rubbing with a cut lemon.


If your like me and are always at your desk, clean your keyboard (where germs are constantly lurking) with a damp micro-fibre soft cloth, add a dab of Eucalyptus oil and not only will you have germ free typing, but a wonderful aroma added to the room as well.

Do the same with all of your door handles....how many times do they get used and forgotten about?

If you have a pool too, don't leave it up to your creepy crawly to get the tiles perfectly clean and don't forget...it can't get into tight corners!
So how do you keep your pool tiles from mould....bi-carb! Yes bi-carb will bring them back to "like new" within minutes. Just use with a little elbow grease and a scrubbing brush or cloth and don't worry about it getting into the water, the creepy crawly can eat it up no probs!


If you have your own favourite remedy or anything else to add, please let me and my viewers know